On this page:
Understanding Filtering Options
Appointments
Your Appointments List contains all of the appointments that your user account has included in its filtering and has permission to see. To add, change or remove appointments, open your appointments list from the Main Menu, by tapping on Appointments.
From here, you can scroll through your past, present and future appointments. Appointments in this list can be opened and changed, new appointments can be added, and this list can also be fine tuned with filtering.
Creating a New Appointment
Start by tapping on the Add New (+) button on the top-right of the appointments list. You will see the appointment detail screen.
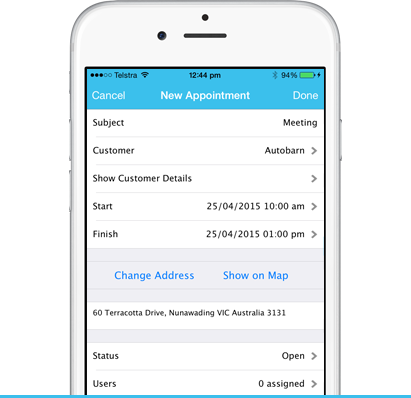
- Subject – This is the title of your appointment and will be shown in your appointments list. This field must be completed in order to save the appointment.
- Customer – If your appointment is with a customer, tap on this field and choose the customer to link it. Once linked, you will see an option to Show Customer Details below, which is just a quick link into the customer’s detail.
- Start and Finish – Your appointment must have a start and finish time in order to save the appointment.
- Change Address – Tap on this area to show the separated address fields for manual entry. If your appointment is linked to a customer, you can pick from their addresses and populate the appointment address quickly. Once an address is linked to your appointment, you can choose the Show on Map option to view the location in the Apple Maps app. Having an address is not mandatory, but if you are grouping your appointment list by Suburb or Postcode, you will want to enter these details in.
- Status – Choose the Appointment Status – eg. Open, Closed.
- Users – If you want to explicitly assign the appointment to one more users, use this option.
To save the appointment, tap Done up the top-right, or go further and make your appointment into a recurring appointment.
Recurring Appointments
If you need to regularly visit or service clients, you can make a series of recurring appointments by tapping the Make recurring appointment option.
What you need to know:
- Appointments can be standalone (once-off), or part of a recurring set (or series) of appointments.
- When you create a series of appointments, you can choose how often they occur – eg. On the first day of each month.
- If details of an appointment within the series (an occurrence) are changed, this creates an exception and this appointment is now treated separately from the rest of the series.
- You can tell the difference between an appointment that is standalone, part of a series or an exception by looking for an icon.
- No icon – once-off
 – part of a series
 – an exception to the series
- You can edit the series by tapping on the symbol of an occurrence. Any changes made to the series only apply from that occurrence forward. It is important to note that this action effectively ends the original series at this date and starts a new series.
- When you edit a series (and therefore start a new one as described above), SalesIn will ask what should be done with any exceptions that exist in the new series. You have the option to remove them or keep them. If you choose to keep them, be aware that depending on the changes made to the series, it may appear as if there are duplicate appointments in your list.
- To make changes to an appointment occurrence, make sure you open the individual appointment by tapping on the appointment itself, and not the symbol, which would mean you are editing the series.
Understanding Filtering & Searching
SalesIn allows you to search and filter your appointments. From the appointments list, tap the Action ([↑]) button up the top-right of the screen, and choose Search Appointments.
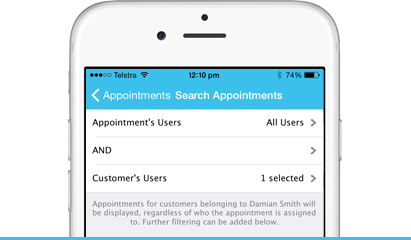
This top area defines the base filtering of your appointments, and will be remembered each time you open up your Appointments list from the Main Menu. SalesIn allows you to show appointments based on how they relate to Users. Appointments can be directly assigned to one or more users, or left unassigned. They can also be assigned to Customers, and Customers can be assigned to one or more users, or left unassigned.
- Appointment’s Users – Include a filter based on the user(s) explicitly assigned to the appointment.
- Customer’s Users – Include a filter based on the user(s) allocated to a customer, which is linked to the appointment.
- AND operator – When used, will show results that satisfy both “Appointment’s Users” and “Customer’s Users” filters
- OR operator – When used, will show results that satisfy “Appointment’s Users” or “Customer’s Users” or both.
SalesIn helps you make sense of this filtering by generating a sentence explaining the criteria for appointments to be shown in the list.
Additional filtering, sorting and display configurations can be used, as described below. SalesIn will then show appointments when all the criteria specified is met.
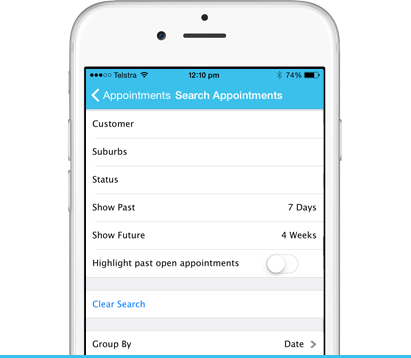
- Customer – Show appointments that belong to a specified customer.
- Suburbs – Specify one or more suburbs so that appointments with an address matching these suburbs are shown.
- Status – Filter by “Appointment Status”. – eg. Open, Closed.
- Show past / future – You can specify a range of time so that only appointments inside this range are shown.
- Highlight past open appointments – Turn this on if you wish for the results to highlight an appointment in the past that is still in 'Open' status.
- Clear Search – Tap this when you would like to view all appointments in the appointments list again.
- Group By – Allows you to group the list of appointments based on Date, Customer, Suburb or Postcode.
Once you have worked out the type of view you would like to have of your appointments, tap the (<) Back button up the top-left to return to your appointments list.