On this page:
Editing & Deleting an Existing Item
- Item (Name)
- Item Code
- Barcode
- Tax Code
- Sales Units
- Unit of Sale
- Sales Unit Price
- Category
- Description
- Delete
Items
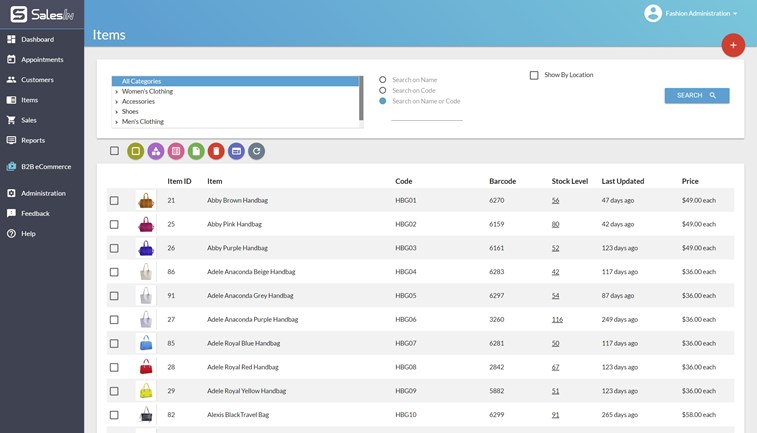
The Items page contains all of the items that your user account has permission to see. To add, change or remove items, click on Items in the menu bar.
From here, you can filter and search for items, as well as add them.

Adding a New Item
- To add a new item, click on the "+" red button at the top right of the page
- You will see the item details screen.
Editing & Deleting an Existing Item
- To change an item’s details or remove them, you must first click on the item.
- A new tab in your browser will be shown, with the item’s details in it (explained below).
Item Details


From here, the following options are available:
Profile
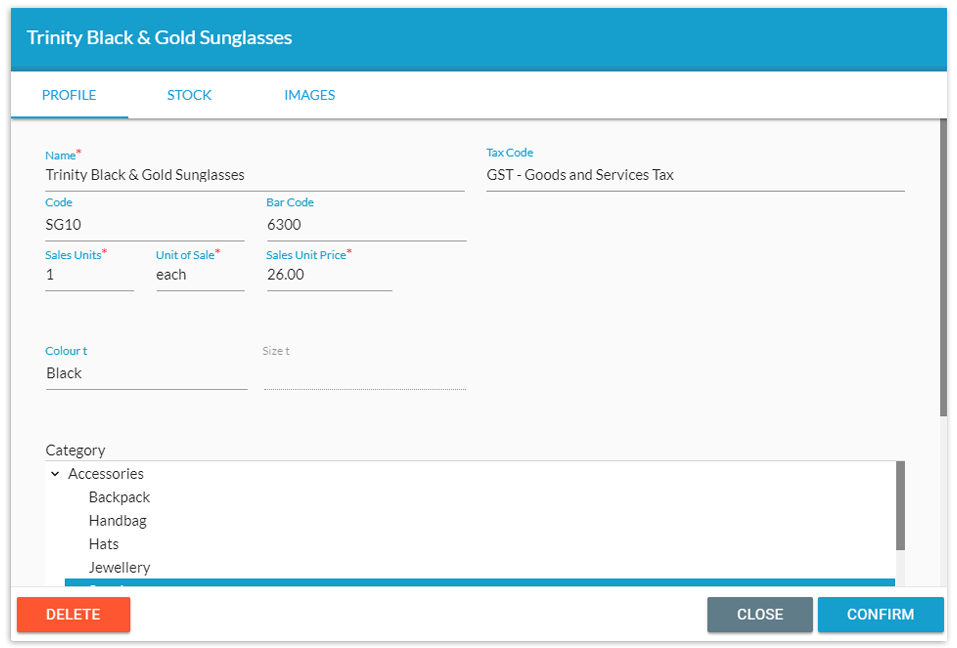
- Item (name) – This first field is for the item name. (mandatory)
- Item Code – If you use a Code to identify your items, enter it here and you’ll see it displayed around SalesIn and be able to search by it.
- Barcode – Enter a barcode here for your item, and you’ll be able to scan a barcode to identify it when creating sales on your device.
- Tax Code – Select the tax code that applies to your item. (mandatory)
- Sales Units – This denotes how many of each item are sold at once. In most cases, this will be set to 1. (mandatory)
- Unit of Sale – This description shows how you measure each item you sell. In most cases, this will be set to “each”. (mandatory)
- Sales Unit Price – The selling price for a single item. (mandatory)
- Category – Every item must belong to an item category. This is used to filter and group your items. (mandatory)
- Description – Enter a long text description of the item if necessary.
- Delete – Removes this item from SalesIn.
Stock
- Units of Sale – Use this area to define multiple measurement units for your item, and how many of each item makes up that unit. (optional)
Images
Upload one or more images to your item so you can see it in all it’s glory when creating sales on a device.
When you have finished editing or looking at the items details, click Confirm (bottom-right) to save it and close this window. If you have made changes, and click Close the changes will not be saved.
**Note**
- If you cannot see some of the options described here, it likely means your user account does not have permission to use these areas.
- If you have Custom Fields enabled for Items, these will also show up on this screen.
- Another reason you may not be able to see or edit all options, is they may have been deactivated by your accounting system. Contact us to find out more.