On this page:
Items
Item Details
The Items List contains all of the items that your user account has permission to see. To add, change or remove items, open your items list from the Main Menu, by tapping on Items.
If you are running the Professional or Complete editions of SalesIn, tapping on Items from the Main Menu will give you a few extra options:
If you are running the Starter edition, you will be taken straight to the Items List.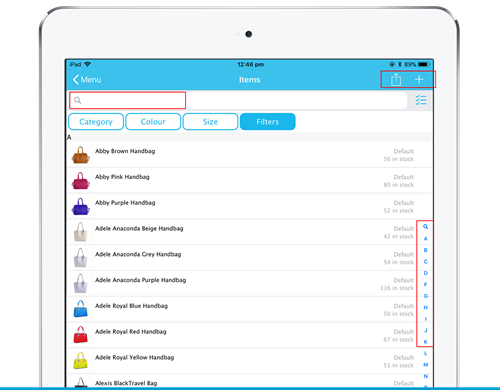

From here, you can scroll through your items, as well as search for an item by name or item code (you will need to ensure the item code settings has been switched on). Additionally, you can use the advanced search option found under the Action ([↑]) button, to search items based on Custom Fields. (If you cannot see the advanced search option, you do not have any custom fields defined.)
Viewing Item Details
Tapping on an item in the Items List (when opening the items list from the Main Menu) will show you the item details. Item details are separated into four areas / tabs, at the bottom of the screen.

Details tab
Shows the basic details of the item, such as name, category, base price etc.
- Category – Item categories are used to group items. An item must belong to an item category or it cannot be saved.
- Item Code – This optional code can be used to identify your item in searches, and can also be displayed alongside your item in lists.
- Tax Code – This tax code is used when this item is sold to customers.
- Sales Units – Defines how many of the item is sold at once. Usually this is set to 1.
- Unit of Sale – Defines the collective term for selling the item – eg “each” or “per box”
- Sales Unit Price – Defines the base selling price per Sales Unit
Description tab
You can add a general, long description against this item for reference.
Stock Levels tab
This will show the current stock levels of the item, across its various item locations (if any). If you are connected to the Internet, your device will query the server for the latest stock levels, otherwise these will be the last known stock levels.
Images tab
You can use this area to view and manage item images. Images can be added using the device camera or by browsing your local photos.
Stocktake
Your stocktake is empty, so tap Add Items to Stocktake:
- In the Items Browser, find the item you want to set the stock on hand value for by using the usual searching and filtering options. Make sure you are working out of the correct Item Location.
- Tap on the item to set its quantity on hand.
- Tap Done.
- The quantity on hand is now set. Once you have set the quantities you want, tap on the < Back button, up the top-left.
- Your list of items and quantities is there to be confirmed.
- Tap Done to save them and return on the Main Menu.
You can also pause a stocktake and come back to it later by tapping on the Cancel button when viewing the list of items that are included in the stocktake and tapping Resume Later.
Stock Transfer
- First, set the location you want to transfer stock to, by tapping in Transfer To.
- Tap Add Items to Stock Transfer.
- In the Items Browser, find the item you want to transfer stock from by using the usual searching and filtering options. Make sure you are working out of the correct Item Location.
- Tap on the item to choose the quantity to transfer.
- Tap Done.
- Once you have chosen your items and quantities, tap on the < Back button, up the top-left.
- Your list of items and transfer quantities are there to be confirmed.
- Tap Done to save them and return on the Main Menu.
You can also pause a stock transfer and come back to it later by tapping on the Cancel button when viewing the list of items that are included in the stock transfer and tapping Resume Later.
Working with the Items List
The Items List can adapt to suit the way you want to work.

Changing the Current View
There are a few options available under the Action ([↑]) button to change the way the items list is presented.
- Show Categories – Changes the view to be category based, instead of a master list of all items. This is useful if you have a large list of items, or prefer to work through item categories rather than the entire list of items.
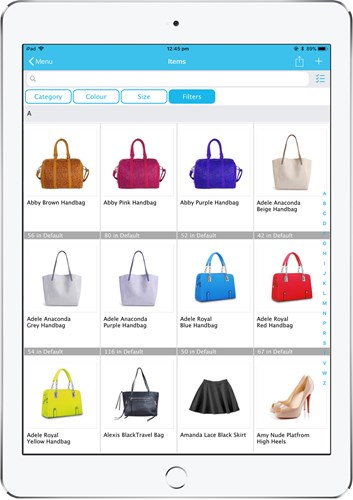
- Gallery View – Changes the list view into a tile view, showing larger photos and placing items side by side. Once in Gallery View, you have the option of using the Zoom setting to control how many items are placed side by side, growing or shrinking the size of the item images. Note that Gallery View is only available if you have chosen to store item images offline.
Gallery View
Change Item Location
If you are using multiple stock locations, you can filter the items list by an individual location, or all locations. Important note – the location you have selected is remembered by SalesIn, and your items list will default to this location the next time you come into this screen.
Barcode Scanning
SalesIn supports hardware based barcode scanning, but also lets you use the device camera to detect barcodes.
- Linea Pro supported hardware – Once you connect your compatible Linea Pro scanner, you simply need to press the button on the scanner and scan a barcode with the laser.
- Camera based – Tap on the Action ([↑]) button, and select Scan Barcode. Hover the camera over a barcode and it will be detected.
When a barcode has been entered on your items, you’ll be able to scan a barcode to identify it when creating sales on your device.