On this page:
Sales
The Sales List contains all sales that your user account has permission to see. To add, change, remove or action sales, open your sales list from the Main Menu, by tapping on Sales.
From here, you can scroll through your sales, as well as change search and filtering options.
Additionally, you can tap onto an existing sale and perform various actions, as described below.
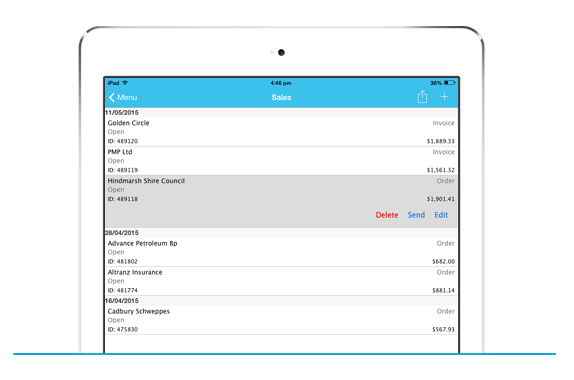
Working with Existing Sales
Tapping on an existing sale, you will see the following options;
- Delete – Removes the sale from SalesIn; this cannot be reversed.
- Send – Allows you to email a PDF of the sale to a customer or general email address, and/or download and view the PDF for printing to a compatible AirPrint printer.
- Edit – Opens up the sale detail for editing.
Delete & Edit are only available if your user has the appropriate permissions. To have this changed, you will need to contact the Admin user, of your SalesIn file.
Tapping on the Action ([↑]) button on the top-right, you will see the following options;
- Delete Sales – Allows selection of multiple sales to remove from SalesIn; this cannot be reversed.
- Search Sales – Shows the filter/search area to control which sales are being shown in the sales list, and how they are grouped.
- Assign Sales – Allows selection of multiple sales for assignment to another user.
- Change Sale Statuses – Allows selection of multiple sales for status changes.
- Combined Report - If you select 'Combined Report', you should then select the sales you would like in this report. This will then force a sync, a PDF document will then be generated with a different page for each sale selected.
Delete Sales is only available if your user has the appropriate permissions. To have this changed, you will need to contact the Admin user, of your SalesIn file.
Creating a New Sale
- To add a new sale, tap on the Add New (+) button up the top-right of the screen.
- If you have more than one Sale Type, you will see a list of them here for you to choose.
- Then, you will be taken into the customer browser to pick your customer for the sale.
Sales are separated into five areas / tabs, at the bottom of the screen.
Please note that depending on how you have set up your sale types, some of these may not be showing.

Customer tab – Shows the selected customer’s name and address details. The billing and delivery addresses can be overwritten to make changes to this sale only.
Items tab – This is the main area, where you add items to your sale. From here you can also tap on the Action ([↑]) button and use:
- Templates – Quickly fill out a sale using pre-defined lists of items, per customer.
- History View – Jump into this view quickly and see what was ordered/sold last time with this customer (iPad only).
Details tab – The details tab shows supporting information for the sale. The following fields are available, however note that some may not be showing, depending on your sale type configuration.
- Status – Choose the status this sale will be set to when it is saved.
- Delivery Date – Fill out the optional delivery date so that this appears on the PDF
- Tax Applies – This determines whether this customer should be charged tax for this sale. It has been set to a default value based on the customer, so may not need to be changed.
- PO Number – Fill out the optional Purchase Order Number so that this appears on the PDF
- Payment Terms – Set the payment terms for this sale. It has been set to a default value based on the customer, so may not need to be changed.
- Comments – Fill out any notes/comments for this sale to show up on the PDF.
- Activity Notes – Jump into the activity notes area for this sale.
Total tab – Shows you the total for the sale, as well as allows payments to be recorded.
Signature tab – Allows you to capture a name and on-screen signature from your customer.
When you have finished creating your sale, tap Done (top-right) to save it.
If you have network coverage and automatic syncing turned on in your settings, you should see an indicator letting you know the device is being synchronised.
This sale will now appear in your Sales List, as well as in the SalesIn Dashboard.
Sales History
Please note this feature is available on iPad only.
You can enter the History View screen by tapping on the Action ([↑]) button, then History View, while in the Items tab of a Sale.
The screen will transform into a tabular view of the Items tab, where you can see the items that were ordered in previous sales for the same customer, as well as items in your current sale.
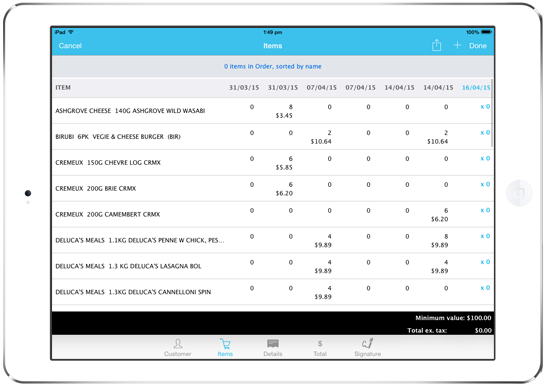
From here, you can tap on the blue quantity of an item that was ordered last time to quickly add it to your order, or simply add items as you normally would (by using templates or the + button up the top-right).
You can alternate between the Items View and History View at any point during your sale.
Payments
If your sale type and company settings support it, and if you have permission, you can record payment transactions against a sale by tapping on the Less Paid field in the Total tab of the Sale.
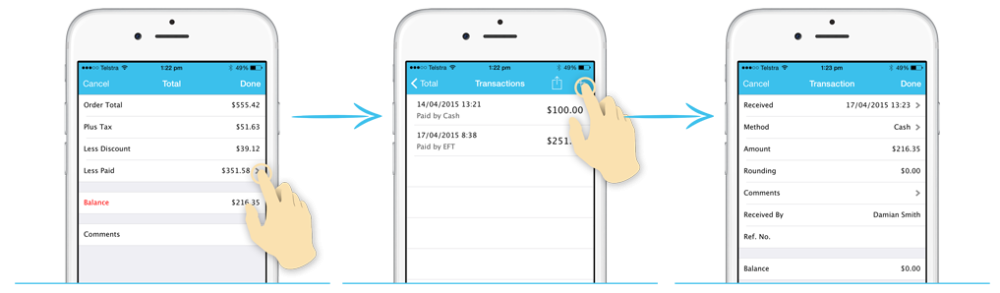
From here you can see any existing transactions listed (and tap to edit those), or you can create a new transaction by tapping on the + button (top-right).
The Payment Detail screen shows the follow fields for entry:
- Received – Choose the status this sale will be set to when it is saved.
- Method – Select the Payment Method for this transaction
- Amount – Enter the amount to be paid. This defaults to the total amount owing. Note that if paying by Cash and the amount needs to be rounded, an additional Rounding field will be shown, indicating the cents being rounded.
- Comments – Enter any comments against this transaction
- Received By – This shows the user who is creating the transaction. This cannot be changed.
- Ref. No. – Enter an optional reference number against this transaction for your own purposes.
- Balance – This value is automatically calculated on the fly as you change the Amount.
If it has been set up, you can also have the option to process the payment via Square and take the payment on a credit card on the iPad.
Tap Done up the top-right to save the Transaction and return to the Transactions List.
Sale Items
When you tap on an item to add it to your current sale, or tap an existing item in your sale to change it, you will see the detail of the Sale Item:
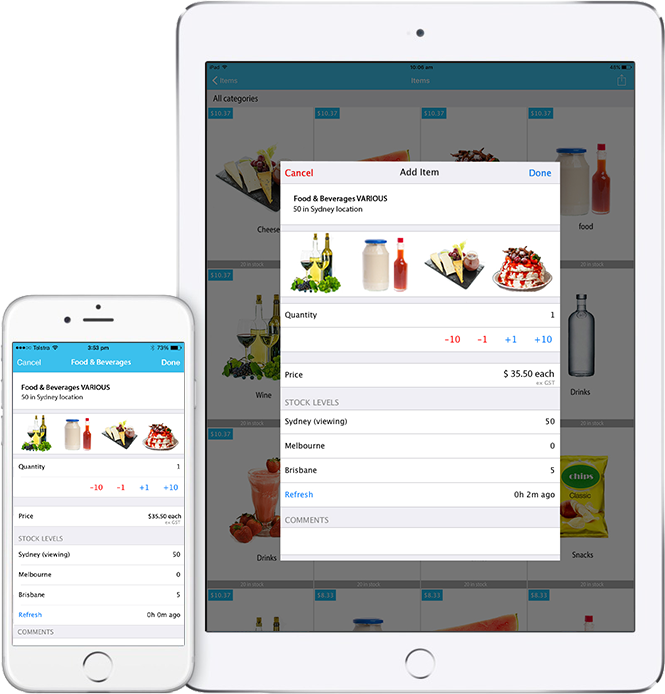
From here, the following options are available;
- Quantity – Allows you to specify the quantity of this item to add to your sale. The -10 -1 +1 +10 buttons below help you quickly bump the quantity up and down. You can also type in a quantity.
- Price – Shows you the current price per item. If you have permission, you can tap this field to make changes to the price by applying discounts. Note if this customer has a specific price, this is the price that you will see, you won't be able to see the usual sell price from this screen.
- Stock Levels – Shows the current stock levels per item location (if available)
- Recent History – Shows the date and quantity of item ordered from this customer recently (if available)
- Comments – Enter comments against this sale item as required. These comments will show up next to the item description in the sale and also on the PDF.
If you have Custom Fields enabled for Sale Items, these will also show up on this screen.
When you have finished with the sale item, tap Done (top-right) to save it and return to your Sale.
Templates
If you have templates set up for a specific customer or all customers, tapping onto the Items tab within a Sale without items will automatically show the available templates.
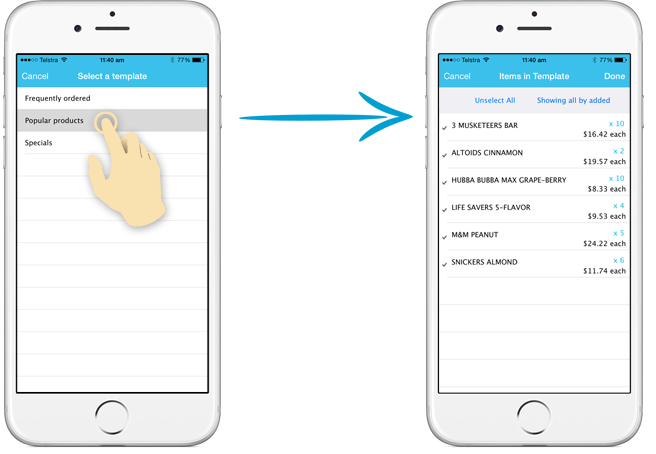
General Usage
If you have multiple templates you will pick the name first, otherwise, you will be taken into the only available template immediately. From here, you can review the items, their price and quantity before adding them in a single action to your sale by tapping Done up the top right.
**It’s important to note that templates always add items into the sale – they never adjust quantities of matching items in the sale.**
You can add items via templates at any stage during the sale, by tapping on the Action ([↑]) button and selecting Add Items from Template.
Things to note when stock is involved & templates are set up to use any stock location
Seeing as templates can be created to take stock from any location, there are certain rules in place that SalesIn follows and it is all interlinked with your device settings.
Where will stock be taken from?
The Preferred Template Location setting mostly defines this.
If you set this to Automatic, SalesIn first looks to the Customer’s Default Item Location (if any) and then through the User’s Item Locations (in their preferred order) until it finds stock greater than zero.
- If you set this to a specific location, SalesIn will choose this location, regardless of whether there is stock in there.
What if there’s not enough stock?
This comes down to your Out of Stock Behaviour setting.
- If you set this to Allow, the stock location will be used regardless of whether there is enough stock. No warning or icon will be displayed, even if the item stock goes into negative.
- If you set this to Disallow and there is not enough stock in the location to fulfil the template, the quantity of the template item will be adjusted to take all the stock that is available, and an icon will be placed next to the template item. When tapped on, it will tell the user “There is not enough stock to fulfil the template, the quantity has been changed.”
- If you set this to Warn and there is not enough stock in the location to fulfil the template, the total stock will be taken (putting the item stock into negative), and an icon will be placed next to the template item. When tapped on, it will tell the user “This item will be in negative stock after this quantity has been taken.”
Learn how to create and maintain Sale Templates on the web portal.
Learn how to modify your device app settings
Printing Settings - Thermal Printer
| Name | Standard Receipt |
| Display Name | Standard Print |
| Font Code | D |
| Page Width | 300 px |
| Character Width | 10 px |
| CharacterGap Width | 2 px |
| Character Height | 18 px |