On this Page:
Sales
Sale Types
Every sale you create belongs to a certain Sale Type. This area helps you create and manage those. By default, SalesIn has a number of Sale Types preconfigured, such as Invoice, Order, Credit Note and Quote.
You may want to add new Sale Types to suit the workflow of your business, or change these ones.
To change and configure your Sale Types, go to the Administration menu, and under Sales, click on Sale Types.
Creating or Editing a Sale Type
Sale Types can be modified to show/hide screens/areas within a sale on the iPad or iPhone, change behaviour with stock, as well as make tweaks to the content of the sales PDF document.
Below is an example of an Invoice Sale Type and all the available configuration options:
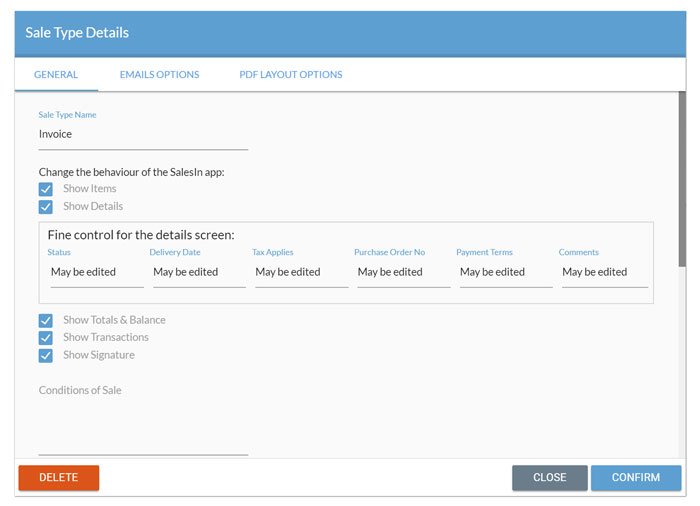
- Sale Type Name – The name you wish to call this sale type – eg. Invoice. This name will appear when you create a new Sale as well as on the PDF.
- Emails to receive notifications – If you enter an email address in here, SalesIn will send notification that the sale has been created or converted between sale types, along with a copy of the PDF as an attachment. This is useful if you want your office to know when a sale has been created by reps on the road.
- Short text to put on report header – This is the main heading of your PDF. For example if your sale type is an invoice, you may want the words “Tax Invoice” as your header when you generate a PDF from a sale. If nothing is entered, this will revert back to the Sale Type Name.
- Short text to put on report footer – If you want any text to go on the footer (bottom) of your sale PDF, enter it here. This is useful for bank details.
- Conditions of Sale – This is the text you want to be available on your iPad or iPhone when getting a customer to fill in their Signature.
- Email to Customer Subject / Body – These will be used as the default subject and body when you send a copy of the PDF to a customer from the iOS app.
- Default Sale Status to – When a new sale is created, this will be the default Sale Status.
- How should stock be adjusted – Choose whether to decrease, increase or have no changes applied to stock upon saving this type of sale. (For example, you may want an invoice to decrease stock, but a quote would have no change to stock. A credit or even a purchase sale type might be used to increase stock.)
- Sale type conversion – Controls whether this sale type can be converted to and from other sale types.
** Note, that when a conversion occurs, any stock changes are reversed.**
For example if you had a Quote sale type which doesn't change stock and converted a sale to an Invoice sale type which decreases stock, then the decrease of stock will automatically occur when the conversion from Quote -> Invoice happens.
Likewise in this example if an Invoice was converted to a Quote, the stock taken by the Invoice sale type would be reversed – ie. it would be increased to put the stock back.
Sales Sharing
- See only their own sales
- See sales belonging to other users
- See all sales, regardless of who they are allocated to
To change and configure your Sales Sharing settings, go to the Administration menu, and under Sales, click on Sales Sharing.
- First make a selection in the Selected User drop down list – this is the user you want to configure
- Below is a list of all other users, as well as a checkbox to say the user can view All sales. If you want the user to view all sales, check this box, otherwise leave it unchecked and click on one or more users in the list of users. (Hold control or shift to make multiple selections)
- As your selections change, you will notice the list of sales in the table below will change. This shows you the customers that your user will have access to.
- Make sure you click Save changes to the Selected User to save your changes before leaving this page.
Sale Status
Every sale has a status assigned to it and this area helps you create and manage those. By default, SalesIn has Open and Closed statuses (both which cannot be changed or removed) which signify the start and the end of a sale’s life cycle. You may want to add new Statuses to suit the workflow of your business.
Example 1
Jimmy works in the office on phone sales and sometimes needs to create quotes using the SalesIn website and send them out to reps in the field. He wants to know whether the rep has received them. He creates a Sales Status called In Progress and implements a business rule that when the reps receive an Open quote, they must mark its status as In Progress so that he knows it has been received.
Example 2
Jane has SalesIn set up and integrated with Xero. When her reps create invoices in the field, they don’t want them to immediately go to Xero, which is set up to transfer sales when they are Open. Instead, she creates a Sale Status called Finalised and changes the Xero integration settings to only pick up sales with the status Finalised. Now, when her reps create new sales as Open, they don’t get picked up by Xero until they have marked the sale as Finalised, indicating they are finished with it.
Further Tips
You can control the behaviour of individual Sale Statuses and make them Read Only, meaning no changes can be made while they are in that Status – unless a website user has the permission to modify Read Only sales. This is useful for locking down information from being changed.
You can also control whether sales of a certain status are Available on Devices. If a sale is set to a status that is not available on devices, it will be removed from the device and hidden until it is in a status that is available on devices.
Sale Templates
You can create 'templates' of items and quantities to be used in a sale, to help rapidly enter items that are commonly ordered together. Templates can be set to apply just to a specific customer (for example, it might be the products they frequently order), or all customers.
To create, modify and delete your Sale Templates, go to the Administration menu, and under Sales, click on Sale Templates.
Creating or Editing a Sale Template
- If you are creating a new template, click on Add Template. Give the template a name, and choose whether it applies to one customer or all customers. To apply to all customers, don't add anything in the Customer field.
- If you are looking to modify an existing template, use the Customer and Template options to find your template.
Below is an example of an existing template called Popular Products, which applies to all customers:

In this example, there are 6 items in the template, each with a specified default quantity.
- Edit Template – Change the name of the template.
- Delete Template – Remove the template from SalesIn.
- Add Item – Adds a new item to the template. Start typing the first three letters of the item name or code that you are looking for. A quantity above zero must be entered in. Click on the green tick to add this item to your template.
Setting up Templates for use Across Multiple Item Locations
When adding an item to a template, you will notice it belongs to a specific location (you will see the name of the item prefixed by the location name). Users won’t see items in their template unless they have access to that location.
Eg. You have Warehouse A and Warehouse B, and stock an item called Cups in both locations, however your two reps only have access to either Warehouse A or Warehouse B, because you want them to sell out of their own stock locations – fair enough. You still want them to use the same templates though, but because you set up the templates with items from Warehouse A, your Warehouse B rep can’t them, even though those items are stocked there.
The solution is to tick the Use Related Items box when adding items to a template. The template will then populate with the items that were previously missing, and your Device Specific Preferences will take over.
Discounts & Price Lists
SalesIn allows you to create special pricing / discounts which are automatically used during sales, based on various criteria.
To create, modify and delete your Discounts and Price Lists, go to the Administration menu, and under Sales, click on Discounts and Price Lists.
Understanding how to set up Discounts
- Discounts consists of a “header”, which defines the name of the discount and the period in which it will apply
- The Discount Item defines discount amount or set price, as well as the criteria under which it is applied.
Below is an example of a simple Discount header called “Bag Discounts %”, and two Discount rules:
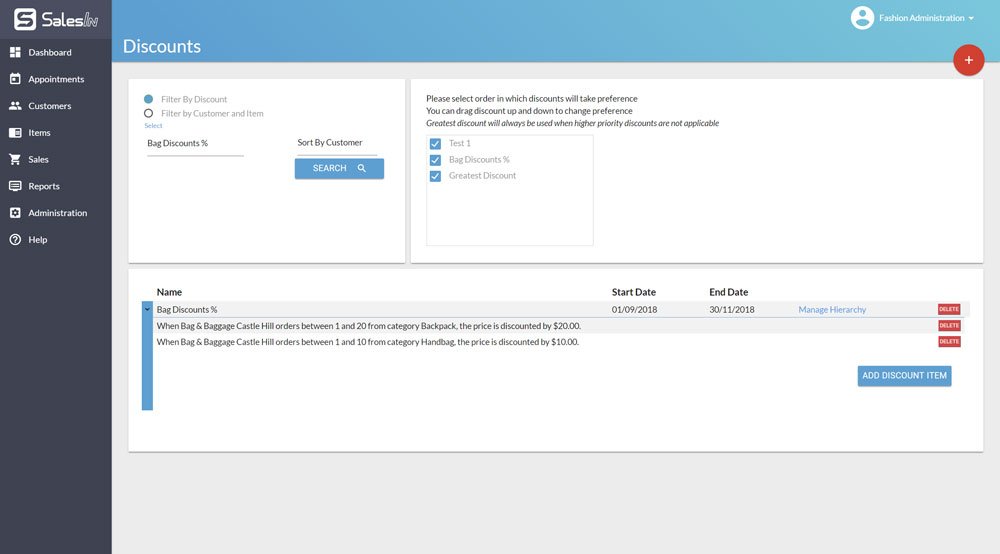
You can click this discount item rule to change it:

- When Customer – Can be Customer or Customer Group, or even Customer Custom Fields
- Orders – Can be Between, At Least or Up to
- of Item – Can be Item or Item Category, or even Item Custom Fields
- from – Specifies the Item Location. Only shown if you have more than one item location.
- the price is – Can be Discounted by Percentage, Discounted by Amount or Set To
How Discount 'Conflicts' are Resolved
There will likely be a time where you have set up a few rules which all apply to a certain item. How will SalesIn know which rule to use?
By default, SalesIn will apply the greatest discount, but if you don’t want to do that, the below section allows you to create a preference order, or Hierarchy, for Discounts. It’s important to understand discount conflicts, because it may change how you set up your discounts to begin with.
In the event that you are implementing a percentage or dollar amount discount (not a set price), it will always come off the Item Price. If you want the price to be taken off a price other than the Item Price (ie. a seperate Discount) then you can set up a discount hierarchy, by clicking on Manage Hierarchy, in the discount header.
For example:
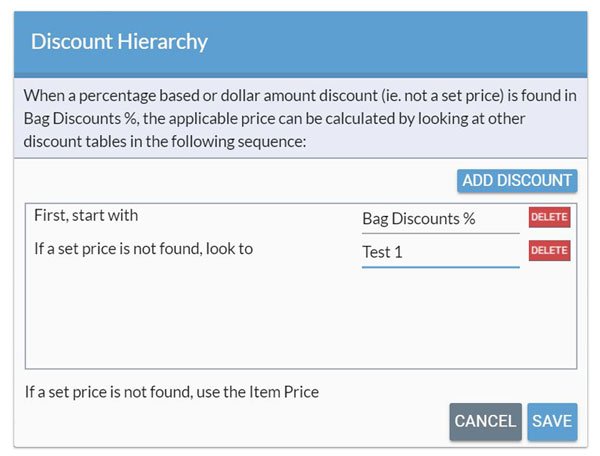
In this example, we have clicked on the Discount Hierarchy for the Bag Discounts % discount header.
If there were any discount rules within the Bag Discounts % which were to take a percentage off or amount off (not a set price), then the Discount header called Test 1 would be looked at for a set price. If no set price was found in there and finally if no price was found there, the Item Price would be used.
Payment Methods
In the Payment Methods screen of the Administration Menu, are the different payment methods you can use to apply payments to an order.
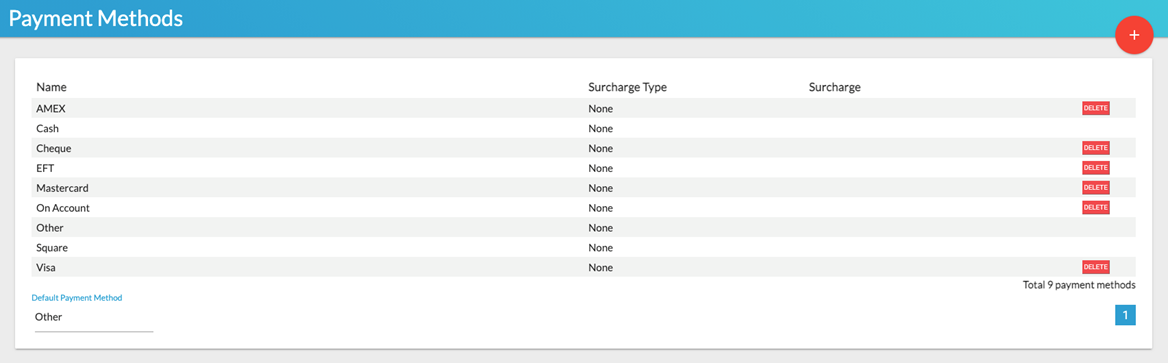
If you are taking a cash payment, either on the iPad or the SalesIn Dashboard, this will be rounded. You can also add and remove different payment methods to help with your reconciling.
Payment Terms
These are the payment terms that can be applied to customers. If you are integrating with an accounting system, these will be added from there, based on what is currently applied to customers.
You can add and remove these based on what is used, however, if you remove a payment term that is applied to a customer in your accounting system, this will be re-added when the integration runs.